ROS web tutorial part 3 - web video server
In the final tutorial of this 3 part web tutorial we will be looking at using a web video server for streaming of camera feed over HTTP.
Requirements
The tutorial below assumes the following tools:
- ROS Melodic running on Ubuntu 18.04
- Catkin tools
- A working camera node (See part 2 of this tutorial series)
ROS web_video_server package
In this tutorial we will be using a web_video_server package to stream our camera feed. ROS wiki description of the package is quite clear:
The web_video_server opens a local port and waits for incoming HTTP requests. As soon as a video stream of a ROS image topic is requested via HTTP, it subscribes to the corresponding topic and creates an instance of the video encoder. The encoded raw video packets are served to the client. Parameters can be specified by adding additional them to the query string.
On numerous occasions while working with this package it was useful for me to refer to the source code. When in doubt I highly recommend checking it out.
Running web_video_server
Without further ado let’s run some experiments with the web_video_server package:
- Let’s make sure that the web_video_server is installed:
sudo apt-get install ros-melodic-web-video-server- Let’s run the camera node from the previous tutorial
roslaunch my_camera elp.launch(make sure your packages are built and sourced!)
-
Run
rostopic listand make sure that at the minimum the raw image (usually as*image_rawtopic) is published. -
Run web_video_server
rosrun web_video_server web_video_serverand navigate to the address http://0.0.0.0:8080/ in your browser.
You should see a webpage similar to this one:
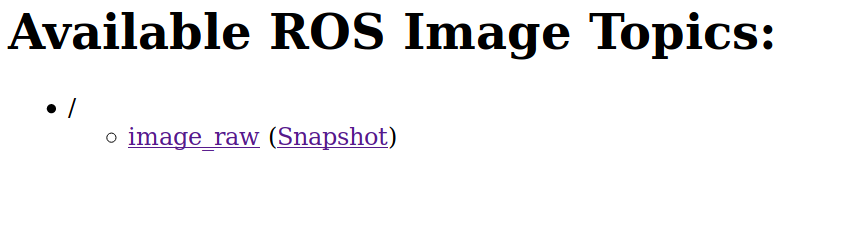
Clicking on a link with the topic name should display the camera stream with default settings in your browser. Right click on the stream image and copy the url of this page, we will use it later. In my case it is http://0.0.0.0:8080/stream?topic=/image_raw.
Configuring the stream
There are multiple parameters to the stream that we can set. You will find them in the wiki and web_video_server source code. We can change the stream settings by modifying the stream url with the name of the setting followed by equality sign and a value. Each setting has to be separated by an & character. An example of such string is: http://0.0.0.0:8080/stream?topic=/image_raw&type=mjpeg&width=300&height=200. This address will make the video server node provide us images appearing on /image_raw topic with an image in mjpeg format and width set to 300 and height to 200 pixels.
Stream types
I would classify the streams web_video_server offers into two basic types:
- image based
- video based
Image based streams
Here are the streams that I found to be working with web video server:
- mjpeg
- ros_compressed
- png
Looking at the documentation for image based formats we can set the following properties through our url:
- width
- height
- quality
- invert
- default_transport - currently not present in the documentation, specifies what image transport to use. By default the valid values are “raw”, “compressed”, “theora”. See image_transport for more information.
Usually we will want to use these settings to control how much bandwidth our camera stream uses. It’s worth noting that any of the above operation requires the server to process the camera stream which leads to increased processing on the server side computer. Basically we trade some CPU cycles for reduction in bandwidth.
As shown before you can append settings to the stream url using &. An example using all of the available settings is:
http://0.0.0.0:8080/stream?topic=/image_raw&type=mjpeg&quality=10&invert&width=640&height=400&default_transport=compressedVideo based streams
The video based types are:
- vp8
- vp9
- h264
I tried various settings following the docs, however I never manage to get a video stream working well enough in Firefox or Chrome to be usable in the applications I’m working on. The main problem I came across is frame buffering on the browser side resulting in a playback delay. I’ve seen delays of up to a minute (!) and the best result I’ve achieved had still 5s delay, making it unsuitable for teleoperating robots. If you have video stream settings that work without noticeable lag feel free to let me know in the comments and I’ll update this post!
Final notes
So far in practical applications I’ve worked in mjpeg streams with ros_compressed transport. The png transport is relatively new but it looks quite promising. The last bit of advice I have for you is to use the lowest camera resolution that works for your application (we’ve discussed how to set the resolution in the previous tutorial). This will minimize the load on your USB bus and processing power required for potential image modifications.
This is the last part of this ROS web tutorial series. The basics we covered plus the roslibjs should allow you to create working web user interfaces for your robots.